Microsoft announced the next major upgrade of Windows 10 on June 24th via an online event. The next version of Windows will be called Windows 11. Quite obvious, isn’t it? No, it isn’t, as a couple of years ago, Microsoft announced that Windows 10 would be the last version. Well, that is past now, Windows 11 is now real and the official public version is available from October 4th, and you might want to install it on your PC. Since the OTA update might take time to reach each PC due to the number of Windows 10 systems. Microsoft usually roll-outs major updates/upgrades in batches so that it reliably reaches the users. But again, reaching everyone could take at least a week or so. Well, nothing to worry about; the good news is that you can download the official ISO file and use it to upgrade to Windows 11. Follow the below instructions to download the Windows 11 ISO file and install it on your PC. Also, Read:
Download Windows 11 ISO File
The below ISO file contains all the Windows 10 Editions listed below:
Method 1: Direct Download Windows 11 ISO
Download the correct ISO file from the links below. These links will generate a direct download link from the official Microsoft server. These are direct download links to the English US ISO files. If you want ISO files in any other language, please comment below with the Language, Windows edition, and System type of the ISO file you want, and we will provide direct download links within 24 hours.
Method 2: From the Microsoft Downloads Page
Go to this URL (Microsoft Windows 11 Download Page).Now, scroll down to the ‘Download Windows 11 Disk Image (ISO)‘ section.You will notice a drop-down menu.
Select Windows 11 from there.
And then click on the Download button.
A new section will appear below that section with the title ‘Select Product Language.’Select your preferred language.
And then finally, click on the Confirm button.
Then a new section will appear with the download link. Click on the 64-bit Download button to start the downloading process.
There you go, the ISO file will be downloaded instantly; make sure you have enough internet bandwidth to download the ISO file; the file size will be around 5 GBs.
Method 3: Using Third-Party Tool (Rufus)
You can even use third-party tools available to download the latest version of Windows 11 ISO in your preferred language and architecture. We will do this using a tool named Rufus to create bootable media. Still, you also can download the latest Windows ISO files directly from Microsoft servers. Follow the below steps to do so,
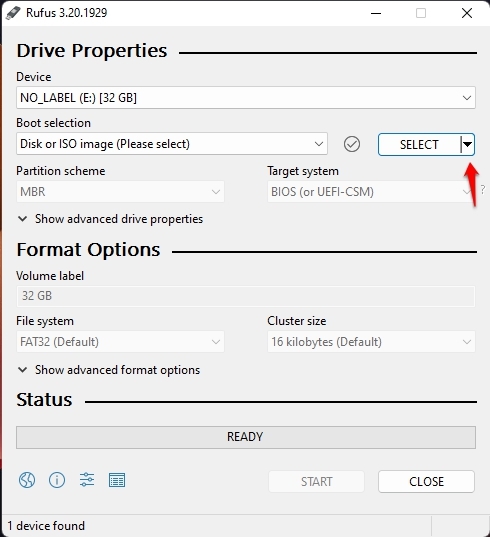
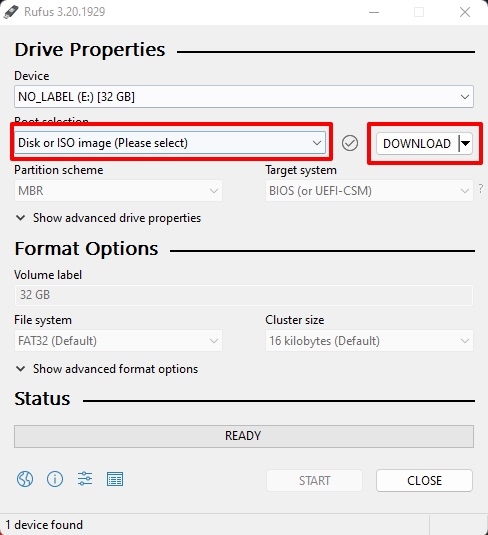
First, you need to download the latest version of Rufus.And then insert an empty flash drive into the system. (Note: without inserting a flash drive, you can’t proceed further) Now, open the Rufus application. Then, in the Boot selection section, select “Disk or ISO image (Please select)” from the drop-down menu.And click on the down arrow and select the “Download” option.
Now, click that Download button, and a new window will appear.
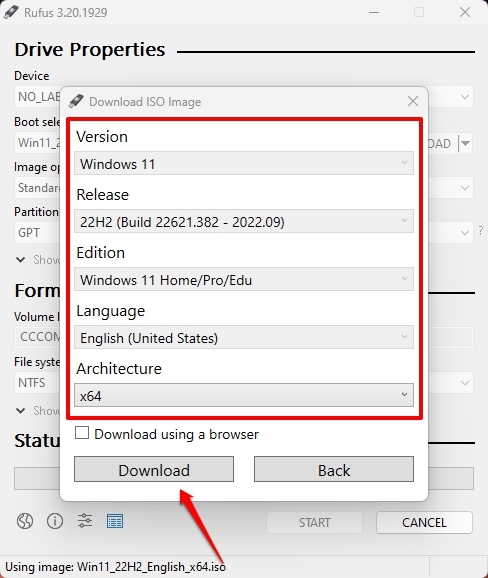
One by one, select Version, Release, Edition, Language, and then Architecture, as shown in the below screenshot.
Finally, a checkbox is above the download button; if you check that, your Windows 11 ISO will be downloaded via a web browser.
Install Windows 11 on your PC (using ISO File)
Method 1: Upgrade Using the Windows 11 ISO File
This is the easiest method to install Windows 11 on your PC; this is also the safest method. You will be upgraded from Windows 10 to Windows 11 with every data on your system un-wiped.
First, download the Windows 11 ISO file from the above-mentioned method(s).Now, open file explorer and navigate to the Downloads Directory.Then, right-click on the downloaded Windows 11 ISO file and select the Mount option.
Now, open the mounted drive and click on the setup.exe file.
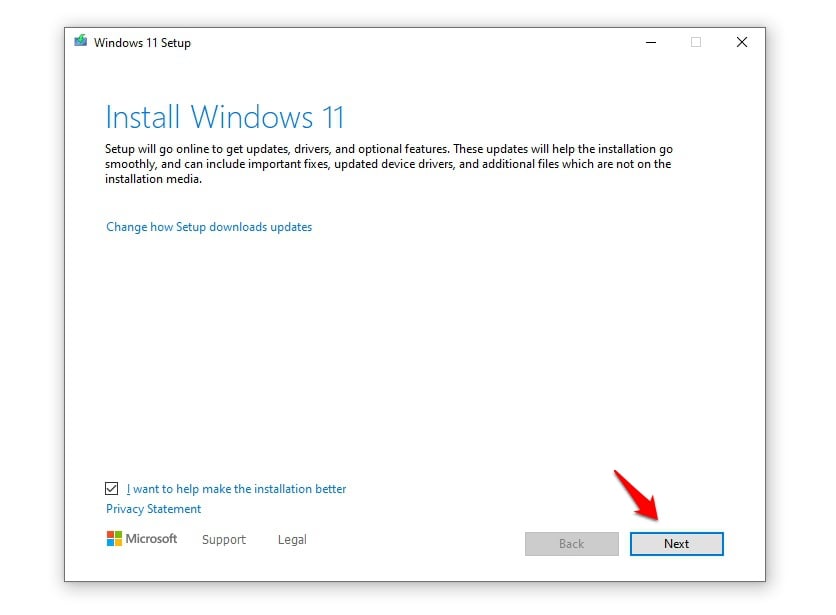
A new Windows 11 Setup window will appear.Click on the Next button to get started with the installation process.
On the next screen, you can choose to install any important updates before upgrading and click Next.
Then, an End User License Agreement window will appear; Accept the agreement to continue.
Finally, click on the Install button to start the installation using the Windows 11 ISO file.
It will start the installation process and will be installed in a few moments.
Method 2: Clean Install Using the ISO File
Create Bootable Media
Method 1: Using Windows 11 Update Assistant
A clean install is always helpful in the case of the installation of an upgraded operating system. This bypasses all the compatibility issues, bugs, and glitches. And finally, you will get a fresh system with a fresh operating system.
First, plug-in an empty flash drive to the system (at least 8 GB, 16 GB is recommended).Now, go to this URL to download the Windows 11 Installation Tool.Then, open the tool by double-clicking the setup we just downloaded.Allow the setup to prepare your device and create installation media for another PC.
Then, select the Language and Edition of Windows 11 and click on the Next button.
Now, select the USB flash drive from the list on the next screen and then click on the Next button.
The tool will start downloading and preparing the Windows 11 installation media.
Finally, you will be notified with a new window titled ‘Your USB flash drive is ready.’ Click on the Finish button.
Now, you can directly jump to the “Windows 11 Clean Installation” section.
Method 2: Using Rufus
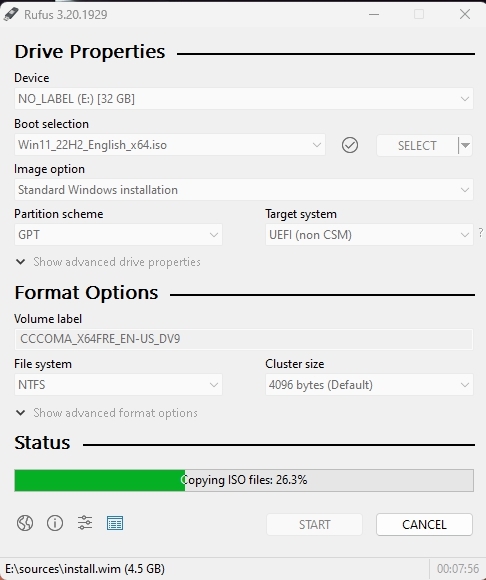
Insert a flash drive, at least 16 GB.Now, open Rufus to create bootable media for Windows 11.Make sure to keep all the default settings as it is.Now, click on the Start button and wait a while to finish.After completion, Rufus will ask you to restart the PC.
Windows 11 Clean Installation
After completion, plug in the USB to the system you want to install Windows 11 and restart the system. And while booting, tap the Boot Menu key before the Windows logo to open it.
You see a screen with a list of drives, choose the one you inserted/plugged in, and hit Enter.Then the Windows logo will appear on the screen for a while; if you see the animated dots, it means everything is fine.
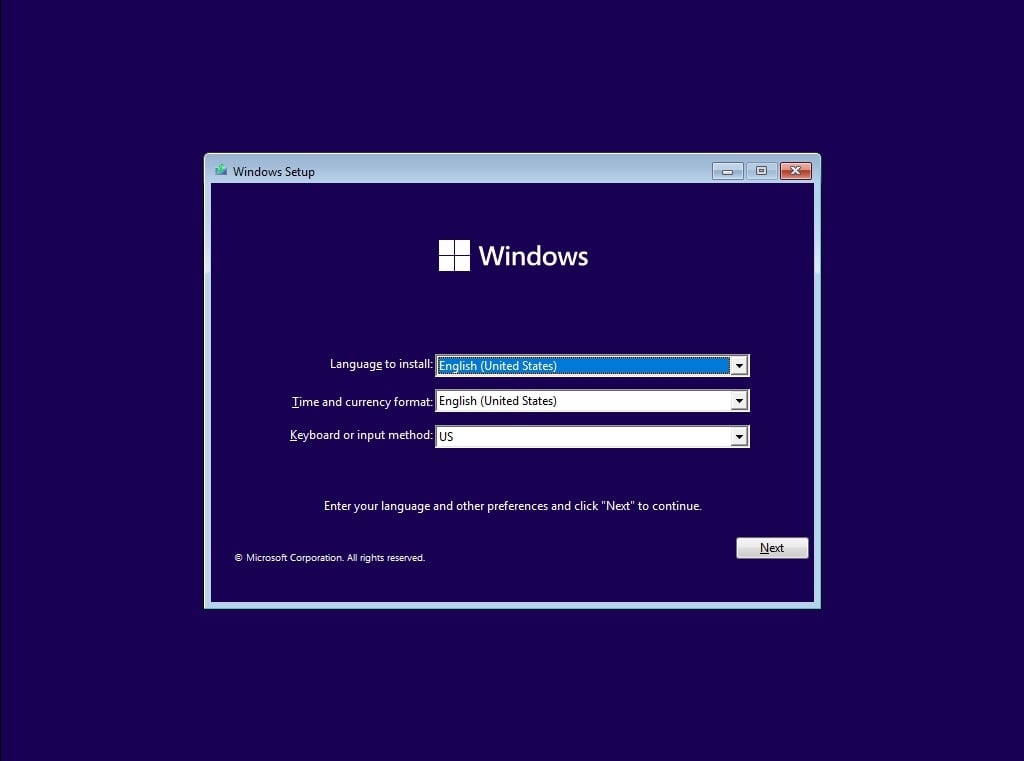
Next, you will be asked to select your Language, Time, and Keyboard method, and after configuring all these things, Click Next.
Now click on Install Now.
Now, Windows 11 set-up will ask you to enter the Product Key; if you have a Windows 11 product key, proceed to enter it. Otherwise, click on “I don’t have a key” or “Do this later.”
Now setup will ask you to choose the correct edition of which you have a License, either Home or Pro. Make sure to enter the correct edition. If you choose the wrong edition, you must perform a clean install again.
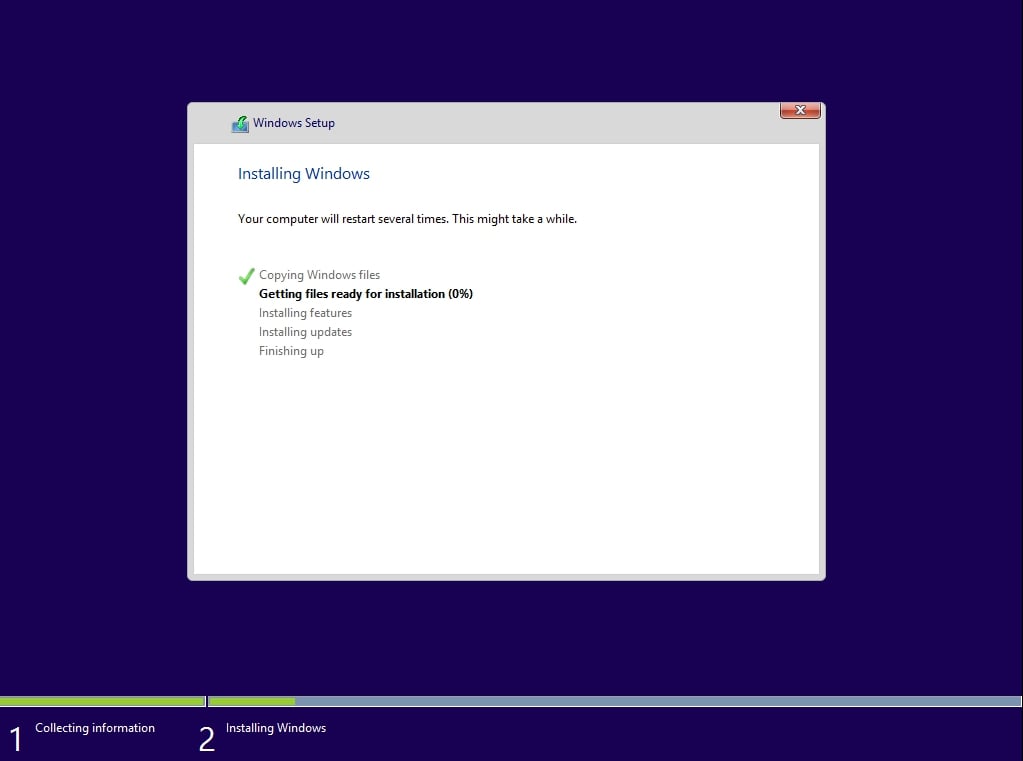
Accept the license terms. To do so, check the box in front of “I accept the license terms.”Click Next.Click Custom: Install Windows only (advanced).Select the drive and then click Next. [If there are multiple partitions, select each from the bottom, then click to delete until only one unallocated drive left]Select the unallocated drive list; Click New > Apply > OK.Select the Primary partition from multiple partitions, and click Next.Just wait for a few seconds while Windows install.
When all this setup completes, Windows will reboot into the setup automatically.
You can now proceed with the Windows 11 setup; we already have covered an article regarding the Windows 11 initial experience, do check that for more reference.
More Downloads
Ghost Spectre Windows 10 Superlite VersionGhost Spectre Windows 11 Superlite VersionDownload Windows XP ISO File (Professional – 32/64 Bit)Download Windows 7 ISO File (Ultimate and Professional Edition)How to Download Windows 8.1 ISO File (32/64 Bit)Download Latest Windows 10 ISO File (21H2 November 2021 Update)
Disclaimer
Spanish Windows 11 Home Single Language Arch.: 64 b









title: “Download Latest Windows 11 Iso File 22H2 2022 Update " ShowToc: true date: “2022-11-28” author: “Carol Eason”
Microsoft announced the next major upgrade of Windows 10 on June 24th via an online event. The next version of Windows will be called Windows 11. Quite obvious, isn’t it? No, it isn’t, as a couple of years ago, Microsoft announced that Windows 10 would be the last version. Well, that is past now, Windows 11 is now real and the official public version is available from October 4th, and you might want to install it on your PC. Since the OTA update might take time to reach each PC due to the number of Windows 10 systems. Microsoft usually roll-outs major updates/upgrades in batches so that it reliably reaches the users. But again, reaching everyone could take at least a week or so. Well, nothing to worry about; the good news is that you can download the official ISO file and use it to upgrade to Windows 11. Follow the below instructions to download the Windows 11 ISO file and install it on your PC. Also, Read:
Download Windows 11 ISO File
The below ISO file contains all the Windows 10 Editions listed below:
Method 1: Direct Download Windows 11 ISO
Download the correct ISO file from the links below. These links will generate a direct download link from the official Microsoft server. These are direct download links to the English US ISO files. If you want ISO files in any other language, please comment below with the Language, Windows edition, and System type of the ISO file you want, and we will provide direct download links within 24 hours.
Method 2: From the Microsoft Downloads Page
Go to this URL (Microsoft Windows 11 Download Page).Now, scroll down to the ‘Download Windows 11 Disk Image (ISO)‘ section.You will notice a drop-down menu.
Select Windows 11 from there.
And then click on the Download button.
A new section will appear below that section with the title ‘Select Product Language.’Select your preferred language.
And then finally, click on the Confirm button.
Then a new section will appear with the download link. Click on the 64-bit Download button to start the downloading process.
There you go, the ISO file will be downloaded instantly; make sure you have enough internet bandwidth to download the ISO file; the file size will be around 5 GBs.
Method 3: Using Third-Party Tool (Rufus)
You can even use third-party tools available to download the latest version of Windows 11 ISO in your preferred language and architecture. We will do this using a tool named Rufus to create bootable media. Still, you also can download the latest Windows ISO files directly from Microsoft servers. Follow the below steps to do so,
First, you need to download the latest version of Rufus.And then insert an empty flash drive into the system. (Note: without inserting a flash drive, you can’t proceed further) Now, open the Rufus application. Then, in the Boot selection section, select “Disk or ISO image (Please select)” from the drop-down menu.And click on the down arrow and select the “Download” option.
Now, click that Download button, and a new window will appear.
One by one, select Version, Release, Edition, Language, and then Architecture, as shown in the below screenshot.
Finally, a checkbox is above the download button; if you check that, your Windows 11 ISO will be downloaded via a web browser.
Install Windows 11 on your PC (using ISO File)
Method 1: Upgrade Using the Windows 11 ISO File
This is the easiest method to install Windows 11 on your PC; this is also the safest method. You will be upgraded from Windows 10 to Windows 11 with every data on your system un-wiped.
First, download the Windows 11 ISO file from the above-mentioned method(s).Now, open file explorer and navigate to the Downloads Directory.Then, right-click on the downloaded Windows 11 ISO file and select the Mount option.
Now, open the mounted drive and click on the setup.exe file.
A new Windows 11 Setup window will appear.Click on the Next button to get started with the installation process.
On the next screen, you can choose to install any important updates before upgrading and click Next.
Then, an End User License Agreement window will appear; Accept the agreement to continue.
Finally, click on the Install button to start the installation using the Windows 11 ISO file.
It will start the installation process and will be installed in a few moments.
Method 2: Clean Install Using the ISO File
Create Bootable Media
Method 1: Using Windows 11 Update Assistant
A clean install is always helpful in the case of the installation of an upgraded operating system. This bypasses all the compatibility issues, bugs, and glitches. And finally, you will get a fresh system with a fresh operating system.
First, plug-in an empty flash drive to the system (at least 8 GB, 16 GB is recommended).Now, go to this URL to download the Windows 11 Installation Tool.Then, open the tool by double-clicking the setup we just downloaded.Allow the setup to prepare your device and create installation media for another PC.
Then, select the Language and Edition of Windows 11 and click on the Next button.
Now, select the USB flash drive from the list on the next screen and then click on the Next button.
The tool will start downloading and preparing the Windows 11 installation media.
Finally, you will be notified with a new window titled ‘Your USB flash drive is ready.’ Click on the Finish button.
Now, you can directly jump to the “Windows 11 Clean Installation” section.
Method 2: Using Rufus
Insert a flash drive, at least 16 GB.Now, open Rufus to create bootable media for Windows 11.Make sure to keep all the default settings as it is.Now, click on the Start button and wait a while to finish.After completion, Rufus will ask you to restart the PC.
Windows 11 Clean Installation
After completion, plug in the USB to the system you want to install Windows 11 and restart the system. And while booting, tap the Boot Menu key before the Windows logo to open it.
You see a screen with a list of drives, choose the one you inserted/plugged in, and hit Enter.Then the Windows logo will appear on the screen for a while; if you see the animated dots, it means everything is fine.
Next, you will be asked to select your Language, Time, and Keyboard method, and after configuring all these things, Click Next.
Now click on Install Now.
Now, Windows 11 set-up will ask you to enter the Product Key; if you have a Windows 11 product key, proceed to enter it. Otherwise, click on “I don’t have a key” or “Do this later.”
Now setup will ask you to choose the correct edition of which you have a License, either Home or Pro. Make sure to enter the correct edition. If you choose the wrong edition, you must perform a clean install again.
Accept the license terms. To do so, check the box in front of “I accept the license terms.”Click Next.Click Custom: Install Windows only (advanced).Select the drive and then click Next. [If there are multiple partitions, select each from the bottom, then click to delete until only one unallocated drive left]Select the unallocated drive list; Click New > Apply > OK.Select the Primary partition from multiple partitions, and click Next.Just wait for a few seconds while Windows install.
When all this setup completes, Windows will reboot into the setup automatically.
You can now proceed with the Windows 11 setup; we already have covered an article regarding the Windows 11 initial experience, do check that for more reference.
More Downloads
Ghost Spectre Windows 10 Superlite VersionGhost Spectre Windows 11 Superlite VersionDownload Windows XP ISO File (Professional – 32/64 Bit)Download Windows 7 ISO File (Ultimate and Professional Edition)How to Download Windows 8.1 ISO File (32/64 Bit)Download Latest Windows 10 ISO File (21H2 November 2021 Update)
Disclaimer
Spanish Windows 11 Home Single Language Arch.: 64 b


